 Eng
Eng CN
CNCatalog
search products
online service
TEL: +86-731-28679679
FAX: +86-731-28679979
Mobile: +86 139 0733 7319
E-mail: info@hvr-magnet.com
![]()
TEL: +86-731-28679679
FAX: +86-731-28679979
Mobile: +86 139 0733 7319
E-mail: info@hvr-magnet.com
![]()
Control box and input, output interface.
(1) The control box back, as following the picture :
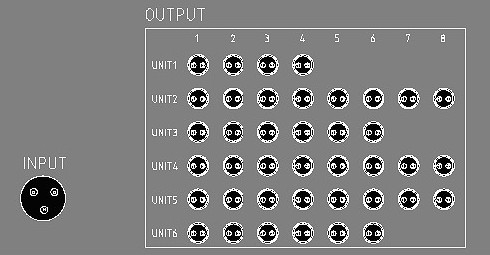
As shown in picture, the INPUT is input interface, and input voltage is AC380v, INPUT aviation connector within the three wiring terminals are respectively connected with 3 phase line.
The OUTPUT is output interface : the output is divided into 6 units , the first unit has 4 output interfaces , the second unit has 8 output interfaces ,the third unit has 6 output interfaces , the fourth unit has 8 output interfaces , the fifth unit has 8 output interfaces , the sixth unit has 6 output interfaces. Please be aviation plug and the one by one corresponding interface unit’ junction box when connected.( 1 input 8 output )
(2) Control box front diagram as following picture :
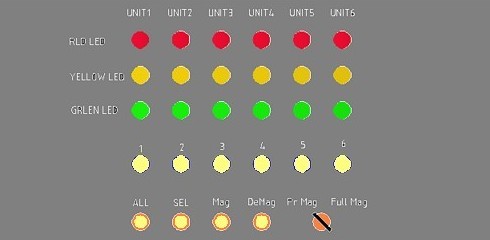
In this picture ,the 6 groups of bright LED indicator lights are respectively that each group operation state , which the red indicator light indicates that group of demagnetization successfully , the yellow indicator light indicates that group of pre-magnetization successfully , the green indicator light indicates that group of magnetization successfully .
If the 3 colors lights of one group have any one is light,it indicates the group is selected and is working; 3 color indicator be turned off that means the group is not selected and will not work.
Button function:
The front panel of controller is set with 10 buttons and a 1 selection switch. The functions are as follows:
ALL (all selection button): If you press this button, the 6 groups of EP magnets are all selected and work together.
SEL (Select button): if you press this button, the 6 groups of indicator lights are all off, then press anyone or a few of the buttons of " 1"," 2"," 3"," 4"," 5"," 6", anyone group and several groups will be selected, the corresponding indicator lights will be on.
MAG(Magnetizing button): if you press this button, controller will be start magnetizing, after this successfully, the group of green or yellow indicator will be light.
DEMAG (Demagnetization button):if you press the button, the controller will be start to demagnetization, after this successfully, and the group of red indicator by selected will light.
PRE MAG/Full MAG ( magnetizing intensity selector switch): Rotary switch to select the "PRE MAG" state, and press MAG button, it will start the pre-magnetization station. The magnetizing strength must be less than full magnetization state, and the EP magnets’ lifting capacity will be lower than rated lifting capacity,also the magnetic depth is lower, so the state is suitable for loading single thin steel plate. After this successfully, the controller of the yellow indicator will light.
When the rotary switch is select " Full MAG" state, press the MAG button ,the controller starts to magnetizing strongly, when it reach full magnetization state, EP magnets’ lifting capacity also reaches maximum value, this is a suitable state for lifting the thicker steel plate. After magnetizing successfully, the green indicator will light.